
Commercial Refrigeration · Retail Merchandising · Australia 2025
Open Display Fridges in Australia: How Doorless Cases Lift Sales — and How to Control Ambient, Sunlight, Humidity, Energy & Food Safety
Doorless “open multideck” fridges remove the small but real hesitation of opening a door. That friction‑free reach boosts impulse selection — if you manage indoor ambient, avoid direct sun, respect the load line and keep products ≤ 5 °C. This guide shows exactly how to choose, install, merchandise, operate and clean open display fridges for Australian cafés, bakeries, delis, convenience and QSR.
Audience: NSW, VIC, QLD, WA, SA, TAS & ACT operators who want stronger front‑of‑house conversion without compromising temperature control or running costs.
Contents
- Search intent & who this helps
- Why doorless fridges convert: the “no hesitation” effect
- Food‑safety baseline for Australia (≤ 5 °C, simple records)
- Climate class & product classes (match cabinet → ambient → food)
- Installation & siting: avoid sun, drafts and humidity pockets
- How to use: temperature gradient, load line, night covers, logs
- Merchandising planogram: place high‑margin and sensitive items
- Cleaning & maintenance SOP (daily / weekly / monthly)
- Energy & ROI: doorless sales uplift vs kWh (worked examples)
- Troubleshooting: symptom → cause → self‑check → fix → risk
- Field notes: Martin Place (Sydney NSW) · Melbourne VIC · Adelaide SA
- Shop related categories
- Deep FAQ
- Book a 15‑minute Merchandising & Ambient Check (free)
Search intent & who this helps
Primary intent: informational — “How do open display fridges increase conversion, and how do I keep food ≤ 5 °C in real conditions?”
Secondary intent: commercial investigation — “Which climate class do I need, how do I avoid sun/drafts/humidity, and what ROI should I expect?”
Why doorless fridges convert: the “no hesitation” effect
Every extra step between a shopper and a product reduces conversion. With a doored cabinet, the micro‑decision to stop → open → reach creates hesitation. Doorless cases remove that barrier, letting customers glance, reach and place in one fluid motion. The result is more touches and more spontaneous pick‑ups — perfect for drinks, sandwiches, salads, parfaits and dessert cups.
- Immediate access: no handle, no swing clearance — customers simply reach.
- Faster queue flow: multiple shoppers can pick simultaneously; fewer bottlenecks.
- Better product theatre: continuous facings, brighter lighting and full‑width visibility amplify appetite appeal.
Important: Doorless only works long‑term if you control ambient and respect the airflow. Keep reading for sunlight, humidity and stocking rules.
Food‑safety baseline for Australia (≤ 5 °C, simple records)
- Hold potentially hazardous food at ≤ 5 °C during display; hot hold at ≥ 60 °C.
- If you use a short display window, apply the 2‑hour/4‑hour rule with labels and records (never re‑chill beyond 2 hours).
- Keep opening / mid‑shift / close logs with a calibrated probe or trusted logger. That evidence supports your food‑safety program.
Climate class & product classes (match cabinet → ambient → food)
Climate classes (store ambient at test)
| Class | Ambient (°C) | RH (%) | Use case |
|---|---|---|---|
| 3 | 25 | 60 | Well‑air‑conditioned interiors away from entrances |
| 4 | 30 | 55 | Busy shop‑fronts, mild drafts, warmer afternoons |
| 5 | 40 | 40 | Very hot/dry or high‑draft sites; expect higher kWh |
Product temperature classes (typical)
- M1 — chilled products held tightly between −1 °C and +5 °C (average in band).
- M2 — a wider chilled band (often up to +7 °C average) for less sensitive items.
For dairy, deli meats and ready‑to‑eat meals, an M1 case at the right climate class keeps you within ≤ 5 °C targets in real service.
Installation & siting: avoid sun, drafts and humidity pockets
1) Before delivery
- Map the air: walk the store; avoid direct HVAC supply air, revolving doors and corridor cross‑drafts that can shear the air curtain.
- Block the sun: never face the case into direct sunlight. Use window film, awnings or side panels to prevent radiant load and product fade.
- Mind humidity: keep away from open dishwashers or steam equipment; high RH increases frosting and defrost frequency.
- Power & drain: dedicated circuit (with RCD), safe routing for the plug, condensate evaporation tray or plumbed drain as specified.
2) Position & level
- Level fore‑aft and side‑to‑side so condensate drains correctly and the air curtain aligns.
- Leave service clearances for intakes/exhausts; never push the back grille hard against a wall unless the manual allows it.
- Joining multiple cases? Use spacer rails, align shelves and keep all load‑limit lines continuous.
3) Commission & stabilise
- Run empty to set point; confirm defrost schedule to your trading hours.
- Load only pre‑chilled product below the load line; re‑check product cores after 30–60 minutes.
- Train the team: sun/draft awareness, night cover use, and “what to do if product > 5 °C”.
How to use: temperature gradient, load line, night covers, logs
Understand the temperature gradient
All open multidecks have a small, natural temperature gradient: the base deck / lower shelves tend to be colder, and the top shelf is usually the warmest within spec. Use that to your advantage.
| Zone | Typical temperature behaviour | Best product placement |
|---|---|---|
| Deck / Bottom | Coldest, most stable | Most temperature‑sensitive: dairy, cut fruit, salads with protein, sushi |
| Middle | Stable, prime visibility | Core RTE offer: sandwiches, wraps, premium beverages |
| Top | Slightly warmer (still within band when correctly run) | Less sensitive items, sealed drinks, ambient‑tolerant snacks |
Golden rules (protect the air curtain)
- Pre‑chill everything. The cabinet maintains temperature; it is not a blast chiller.
- Respect the load line. Nothing should sit above it or block perforations/returns.
- Use night covers after trade to cut infiltration and speed morning pull‑down.
- Log temperatures (opening / mid‑shift / close) and note corrective actions.
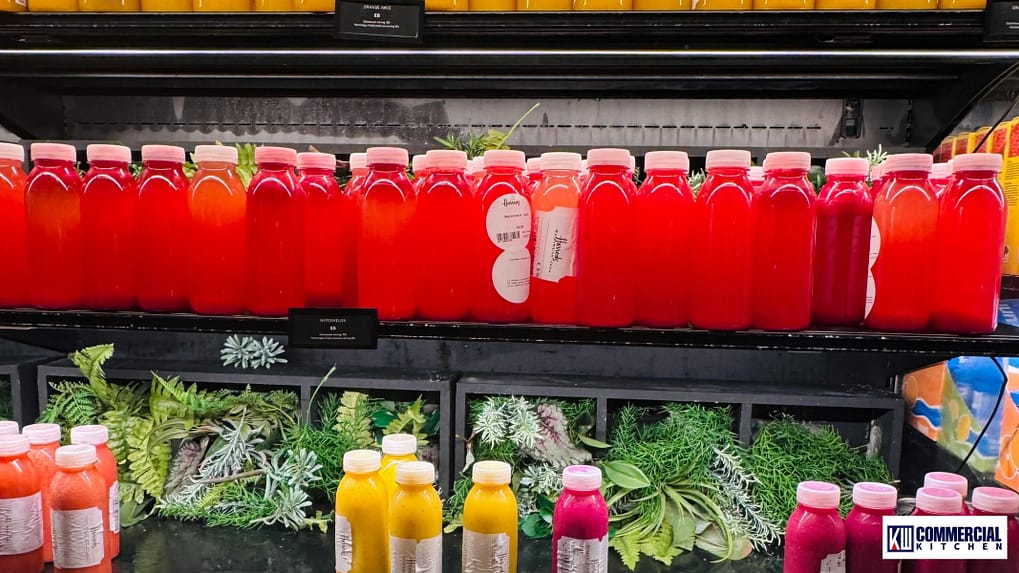
Merchandising planogram: place high‑margin and sensitive items
Doorless = faster choices. Use it to stage high‑margin items in the prime zone.
- Eye level (prime zone): place high‑margin heroes — premium salads, protein wraps, parfaits, specialty drinks.
- Lower shelves (coldest): place temperature‑sensitive items — dairy desserts, sushi, salads with chicken/seafood.
- Top shelf: place tolerant items — sealed drinks, robust pastries, shelf‑stable add‑ons.
- Cross‑sell adjacency: drinks flanking salads; dessert cups next to fruit pots; add “bundle & save” price rails.
- Face‑out & full fronts: keep a continuous wall of product; tidy facings hourly in peak.
- Signage that sells, not blocks: use rail tags and small wobblers only; never drape signs over discharge/return air.
Behavioural note: Doors can create micro‑hesitation (“should I, shouldn’t I?”). Doorless access removes that pause, encouraging spontaneous reach‑ins at the exact moment appetite peaks.
Cleaning & maintenance SOP (daily / weekly / monthly)
Daily (close)
- Remove product to backup refrigeration; wipe shelves, liners, ticket rails with food‑safe detergent; rinse and air‑dry.
- Empty crumb/condensate trays; confirm no standing water; clean the kick fascia.
- Lower night cover fully; wipe the cover edge; confirm the seal.
- Probe a sample set before re‑stocking (target ≤ 5 °C).
Weekly
- Brush/vacuum condenser intakes and fans; dust/lint are the #1 cause of slow recovery and high kWh.
- Flush the drain with warm water; check the evaporator pan/heater if fitted.
- Inspect night cover for tears/misalignment; clean tracks.
Monthly
- Verify controller set‑points, defrost schedule and probe placement; record a full‑day temperature profile.
- Review logs; retrain on load‑line discipline and sun/draft awareness.
Energy & ROI: doorless sales uplift vs kWh (worked examples)
Open cases spend energy to hold an air curtain; doored cases spend less but can slow picking. Model both sides for your site:
| Case width | kWh/day* | Tariff ($/kWh) | Daily energy cost | Avg. gross margin/serve | Base serves/day | Sales uplift | Extra serves/day | Extra GM/day | Net/day (GM − energy) | Capex (ex‑GST) | Payback (days) |
|---|---|---|---|---|---|---|---|---|---|---|---|
| ~1.2 m | 12 | 0.32 | $3.84 | $1.80 | 180 | +20% | 36 | $64.80 | $60.96 | $6,900 | ≈ 113 |
| ~1.8 m | 25 | 0.32 | $8.00 | $2.20 | 260 | +30% | 78 | $171.60 | $163.60 | $9,800 | ≈ 60 |
| ~2.5 m | 40 | 0.32 | $12.80 | $2.50 | 320 | +40% | 128 | $320.00 | $307.20 | $13,900 | ≈ 45 |
Improve net: (1) choose the right climate class, (2) site out of sun/drafts, (3) use night covers without fail, (4) keep returns clear and stay under the load line.
*Use your model’s registered kWh where available; apply your own tariff and trading hours.
Troubleshooting: symptom → cause → self‑check → fix → risk
| Symptom | Likely cause | Self‑check | Fix now | Risk if ignored |
|---|---|---|---|---|
| Top shelf reads warm | Sunlight, cross‑drafts, over‑stock above load line | Look for sun patches; feel discharge/returns | Shade glass; move case off draft; re‑face below line | Product > 5 °C; compliance risk |
| Water on deck/floor | Blocked drain; high RH; case not level | Warm‑water test down the drain | Flush; re‑level; check pan heater/evap | Slip hazard; hygiene; corrosion |
| “Soft” products late day | Night cover not used; condenser clogged | Check cover; inspect condenser | Use cover nightly; brush condenser | High kWh; temperature drift |
| High energy bill vs last month | Ambient spike; vents blocked; damaged cover | Check store temp/RH logs; inspect vents & cover | Improve airflow; repair cover; consider Class‑4/5 model | Persistent over‑consumption |
| Frequent defrosts | High humidity; warm stock; doorless opening facing HVAC | Observe frosting pattern; check loading habits | Reduce moisture sources; re‑site; enforce pre‑chill | Ice on coil; poor recovery |
Field notes (anonymised): Martin Place NSW · Melbourne VIC · Adelaide SA
Martin Place (Sydney CBD) — Espresso bar with RTE
Need: commuter impulse; HVAC drafts near entry; western sun late afternoon.
Approach: Class‑4 open case angled away from doors; UV film on glass; strict load‑line training; night cover down at close; high‑margin salads at eye level; dairy cups on the deck.
Outcome: faster morning pick‑ups, stable ≤ 5 °C probes, tighter evening energy with night cover.
Melbourne VIC — Convenience micro‑format
Need: maximise facings with minimal friction; keep kWh controlled.
Approach: mid‑width multideck with side panels; planogram by occasion; weekly condenser brush; “blind down” SOP; high‑margin energy drinks at eye level, chilled protein on mid‑lower shelves.
Outcome: consistent core temps, reduced overnight energy, stronger basket adds.
Adelaide SA — Deli & meal solutions
Need: keep RTE ≤ 5 °C while showcasing variety; afternoon sea‑breeze drafts.
Approach: Class‑4 case with short side‑screens; case moved off direct draft; high‑margin deli bowls at prime zone; cut fruit on the deck; time stickers for short “out of case” tastings.
Outcome: audit‑ready logs and more confident up‑selling from the eye‑level band.
Deep FAQ
Why do doorless fridges lift sales?
Because there’s no “open the door” hesitation. Shoppers can glance, reach and go — ideal for impulse RTE. Combine that with eye‑level merchandising for the biggest effect.
How do I keep product ≤ 5 °C?
Pick the right climate class, site out of sun/drafts, pre‑chill stock, keep under the load line, use night covers after trade and log temperatures each day.
Where should I place the most perishable items?
On the deck or lower shelves (coldest zone). Keep the top shelf for sealed drinks and less sensitive items.
What about humidity?
High humidity adds moisture load: expect more frosting and defrosts if you’re near steam/dish areas. Re‑site if needed and keep covers down after hours.
Are doored cabinets more energy efficient?
Usually yes, because they reduce air infiltration. Use the ROI table to see whether doorless sales gains outweigh the extra kWh on your site.
Book a 15‑minute Merchandising & Ambient Check (free)
Send us a photo of your install spot, a quick ambient snapshot (°C/RH) and your menu. We’ll reply with climate‑class advice, shade/draft fixes, a planogram for high‑margin items and a personalised ROI estimate.
- Phone: 1300 001 366
- Contact form: Request a callback (responses within a few hours)
- WhatsApp: message us via the site chat
- Service: Sydney same‑city install available; warehouse pickup or Australia‑wide delivery